
Six Expert Tips for Winterizing a Camper Van
At Eastside Autoworks / Campers NW we work hard to be the most trusted source for service on Eurovan / Metris and other Class B Campers. We are your go-to for upgrades and conversions small and large. We’re also very committed to helping you avoid problems before they set in. With that goal in mind, we’re sharing important van winterizing tips to keep your sweet ride protected in the months ahead.
1. Drain the Water System
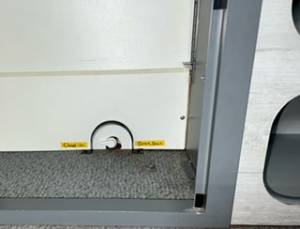
If you’re winterizing a Eurovan camper, or any other camper with plumbing, one of the most important things to do is to drain all of the water out to avoid a crack in a tank, line, or connection point. While temperatures tend to be more mild in the Pacific Northwest, water freezes at 32°F and it’s always a good idea to drain your van’s water system before a cold snap arrives. While you will want to run the sink tap and shower head to make sure that all of the water is fully out, the fastest route to draining the fresh water tank is by opening the drain valve located in the middle cabinet at the bottom. See the owner’s manual for other camper vans (Revel/Storyteller/Peace Vans-Metris, etc.) about where to use RV antifreeze in the system. Then, drain the gray water tank under the van at the dump station, and you will be good to go.
2. Get Your Tires Inspected and Carry a Spare
Slippery, snowy roads are no joke. Making sure that your tires are in good condition can go a long way to keeping you safe. Get your tires checked out to make sure they have enough tread and that they are properly inflated. If you anticipate driving in snow, you may also want to consider upgrading to winter tires for better performance in snowy conditions. Carry those cable chains, tightening straps and something waterproof to lay on when installing.
It’s also wise to carry a spare, especially if you’re going to be in semi-remote locations outside general service areas for emergency towing and repair services. And even within range, having a full-size spare on board will prevent you from having to be towed to a shop in case of a flat. (As a side note: if you live in areas where the roads get salted, we recommend putting an anti-seize compound on the spare carrier bolts under the van so they don’t rust and become difficult to remove — and make sure that your lug wrench is on board.)
3. Keep Your Batteries Fully Charged
Cold weather is tough on batteries and the colder the temps, the faster they lose their charge. If you’re going to drive your van on a regular basis you should be just fine, but some of our customers find that their vans sit, sometimes for weeks, between winter road trips. If that’s the case for you, there are a few different options to consider.
If your van is parked in a garage or in a carport with access to power, you may want to stay connected to shore power to keep your battery sufficiently charged. If power isn’t readily available, or you’re parked on the street, set a calendar reminder to connect every two to three weeks and bring your batteries back up to full capacity. Alternatively, schedule periodic drives. Just be sure to drive for at least 30 minutes. It’s not enough to just start it up and drive around the block. In fact, that can cause condensation in the exhaust and cause more harm than good. It’s important to get everything fully warmed up.
4. Get an Oil Change and Top-Up Fluids
While you’re getting your oil changed, make sure your service also includes a top-up of essentials including brake fluid, coolant, and wiper fluid (freeze-protection type). This is also an opportune moment to ensure that your wiper blades are good to go. If they’re worn down, it’s worth replacing them with a new pair. We’ve all been caught in inclement weather with bad blades and it’s not fun!
5. Promote Ventilation and Prevent Moisture Buildup
Another hugely important winterizing step for vans is to keep moisture at bay. Inspect the exterior (roof, seals, windows, doors, etc.) for holes and cracks. Before resealing any problem areas, determine the appropriate type of sealant for your van and climate. You want to make sure the sealant will be properly set.
Just as you want to program a check-in on your batteries, you’ll also want to make sure that you don’t see a build-up of condensation or signs of excess interior humidity. It’s a good habit to regularly run your defrost and to use a few tubs of desiccant to soak up interior moisture. If you really want to be vigilant, periodically running a dehumidifier inside the van in tandem with a fan is a great safeguard, especially in super damp climates like the Pacific Northwest.
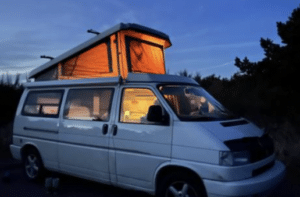
Inspect the pop top for any build-up of debris between the roof basket and the main top area. Make sure the canvas is tucked in behind the gasket so you reduce the chance of moisture damaging the tent. If you’re parked outside, you may also want to consider covering your van to protect it against the elements. It’s worth investing in a cover made specifically for your van rather than a basic plastic tarp because a run-of-the-mill tarp may end up restricting ventilation and causing problems.
A well-designed van cover will include a zippered opening so you can get in and out of the van without having to remove the entire cover along with integrated straps so you can cinch it down and keep it from flapping around and damaging the exterior. Lastly, after you have been out on an adventure, it’s worth the time to properly dry out your canvas pop top before stowing it away. This will help to avoid mildew.
6.Be Prepared for Emergencies
Nothing brings you peace of mind like being well prepared, and it’s especially important when you’re venturing out in cold-weather conditions. It’s always wise to assemble a few essentials including:
Jack
Headlight bulbs
Fuses
Jump pack
Engine Oil
Tire Chains/gloves
Blanket
Headlamp
Warm boots
While getting your van prepped for winter is admittedly a bit of work, we can speak from experience when we say it’s well worth the effort. Of course if you’re strapped for time or worried that you’re not going to be able to tackle some of the things on this list, we’d be happy to winterize your van for you. And we’re happy to answer questions if you need more guidance on something specific.
The good news is that it will feel great to have your van ready for cold weather and to know that you can hit the road and enjoy all of your winter adventures with confidence. If you found our van winterizing tips helpful and you’d like to receive future recommendations, be sure to sign up for our monthly email updates covering everything from van maintenance to the best camping spots in the Pacific Northwest to inspiring van builds and road trip playlists. Have fun out there!
Reach out for Service Appointment (EuroVan, Mercedes-Benz Metris/Sprinter Camper, Ford Transit Camper, and Pro Master Camper)
https://www.eastsideautoworks.com/contact/
Sign up for our email list or drop us line:
https://www.campersnw.com/contact